Your eyes take 20–30 minutes to fully adapt to the dark, and a single glance at a bright white phone screen can undo most of that. Red light is the least disruptive to dark adaptation, which is why astronomers use red torches and why observatories light their control rooms in red.
Darkfield doesn't ship its own red-screen mode — iOS already has a much better one built in. Because it's a system-level setting, it turns everything red: Darkfield, your star charts, Messages, the lock screen, the Home Screen, notifications — the lot. That's exactly what you want at the eyepiece.
This page walks through setting it up once, then wiring it to a physical button so you can toggle it in the dark without looking at the screen.
Turn on the red colour filter #
- Open Settings.
- Go to Accessibility › Display & Text Size › Colour Filters.
- Turn on Colour Filters.
- From the list of filters, choose Colour Tint.
- Two sliders appear underneath: Intensity and Hue.
Setting intensity and hue #
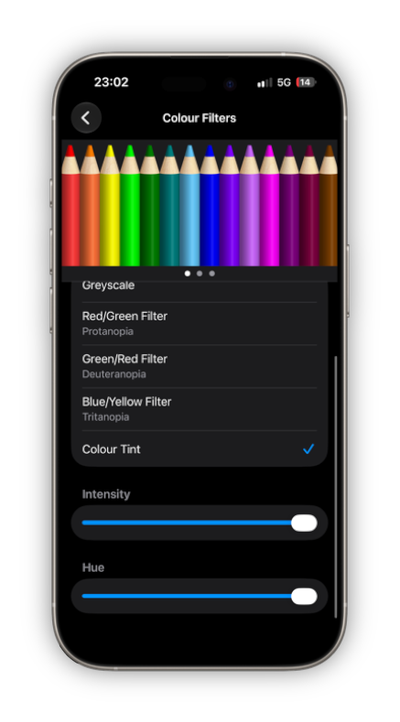
The screenshot above shows the settings you're aiming for:
- Intensity — drag this all the way to the right. At lower intensities the filter only tints the screen, and you'll still get plenty of blue and green light leaking through. At maximum, everything is rendered in shades of a single colour.
- Hue — drag this to either end of the slider. The hue slider runs around the colour wheel, so both the far left and the far right are red — they're equivalent, so pick whichever is easier to reach. The screenshot shows it at the far right.
The row of coloured pencils at the top of the screen is a live preview. With intensity at maximum and hue at either end, every pencil should look red — if you can still make out green or blue ones, nudge the sliders further.
Reduce brightness too #
A red screen is only half the job; a bright red screen still hurts. While you're in Display & Text Size, also turn on Reduce White Point and set it to around 75–100%. This dims the brightest parts of the screen well below what the normal brightness slider allows.
Combined with the brightness slider at its lowest and Dark Mode enabled, this gets the screen dim enough to read comfortably next to a telescope.
Toggle it with a button #
You won't want to dig through Settings every time you look up from the eyepiece. iOS gives you several ways to flip the filter on and off with a single physical gesture.
Action Button (iPhone 15 Pro and later) #
The Action Button is the best option if your iPhone has one — it works with gloves on, without looking, and even from the lock screen.
- Go to Settings › Action Button.
- Swipe to Accessibility.
- Tap Choose a feature and select Colour Filters.
Now press and hold the Action Button to toggle the red filter. If you'd rather keep the Action Button for something else, the options below work on every iPhone.
Accessibility Shortcut (triple-click the side button) #
- Go to Settings › Accessibility › Accessibility Shortcut (it's at the very bottom).
- Tick Colour Filters.
Triple-click the side button (or the Home button on older iPhones) to toggle it. If you tick more than one feature here, a menu will pop up each time asking which one you want — so keep it to just Colour Filters if you want a single-press toggle.
Back Tap #
- Go to Settings › Accessibility › Touch › Back Tap.
- Choose Double Tap or Triple Tap, and select Colour Filters.
Two quick taps on the back of the phone will toggle the filter. This works through most cases.
Control Centre #
- Open Control Centre, then tap + in the top-left and choose Add a Control.
- Search for Accessibility Shortcuts and add it.
Provided Colour Filters is set as your Accessibility Shortcut (see above), tapping this control toggles it. You can also add Reduce White Point and Dark Mode controls alongside it for a compact "night panel".
Automate it with Shortcuts #
For a truly hands-off setup, the Shortcuts app can turn the filter on and off for you. The Set Colour Filters action lets any shortcut or automation switch it.
Turn it on when you open Darkfield #
- Open the Shortcuts app and go to the Automation tab.
- Tap + › App.
- Choose Darkfield, tick Is Opened, and select Run Immediately.
- Tap Next, then New Blank Automation.
- Add the Set Colour Filters action and set it to Turn On.
You can add a second automation for Is Closed that turns it off again — though if you're at the telescope you'll probably want to leave it on until you're back indoors.
Turn it on at sunset #
- In the Automation tab, tap + › Time of Day.
- Choose Sunset, add an offset if you like (for example 30 minutes after), and set it to repeat Daily.
- Tap Next, add Set Colour Filters › Turn On, and optionally Set Appearance › Dark and Set Brightness to a low value.
Pair this with a Sunrise automation that turns everything back off.
Build a "Night Mode" shortcut #
If you'd rather bundle everything into one tap, create a shortcut that:
- Set Colour Filters › Toggle
- Set Appearance › Dark
- Set Brightness › 10%
- Set Focus › Do Not Disturb (optional, so notifications don't light the screen)
Add it to your Home Screen, the Lock Screen widget area, or a Control Centre Shortcut control — or assign the whole shortcut to the Action Button via Settings › Action Button › Shortcut.
Things to know #
- Screenshots and photos aren't affected. The filter is applied at the display level, so anything you capture will look normal.
- The camera preview is red too, which can make it hard to frame an astrophotography shot. Toggle the filter off briefly if you need to see true colours.
- Face ID still works in the dark — the sensors are infrared and don't rely on the screen.
- Apple Watch has its own Colour Filters setting under Settings › Accessibility, so you can give it the same treatment.
- Mac and iPad both have identical Colour Filters settings under System Settings › Accessibility › Display (Mac) and Settings › Accessibility › Display & Text Size (iPad), so Darkfield on a larger screen can be just as dark-adaptation-friendly.